How to Separate Excel Tabs Into Separate Files

Sometimes, you might need to divide the Excel sheets in your workbook into separate Excel or PDF files for various reasons.
This tutorial shows five techniques for separating Excel sheets into separate files.
Table of Contents
Method 1: Using Cut and Paste to Separate Excel Sheets into Separate Excel Files
If your Excel file has only a few sheets, you can use “Copy” and “Paste” to divide it into separate workbooks.
Suppose you have the following workbook with four worksheets.

We want to use “Copy” and “Paste” to split the workbook into separate files.
We use the below steps:
- Create a new folder on your computer where you can save the separated files. Once you’ve created the folder, save the main workbook in it.
- On the first worksheet that you want to separate, click the “Select All” button in the upper-left corner to select all the data on the worksheet and press “Ctrl + X” to cut it.
- Create a new workbook, select a cell in the workbook, and press “Ctrl + V” or press “Enter” to paste the data.
- Save the new workbook with an appropriate name in the folder you created earlier.
- Repeat steps 2 to 4 for the other sheets you want to separate into individual files.
After completing the steps above for each target sheet, separate Excel files for each sheet in the original file will be created, as shown below:

Note: Separating a large file with multiple worksheets into individual files using this copy-and-paste technique can be tedious and cumbersome. To simplify this process, you can try the move or copy method covered next.
Method 2: Use the Move or Copy Feature to Separate Excel Sheets into Separate Excel Files
If you have a workbook with only a few sheets, you can utilize the “Move or Copy” feature to divide them into separate files.
Let’s consider the following workbook, which has four worksheets:
We want to use the “Move or Copy” feature to split the worksheets into separate workbooks.
We use the following steps:
- Create a new folder on your computer where you want to save the separated files and save the main workbook into this folder. The folder will help keep everything organized.
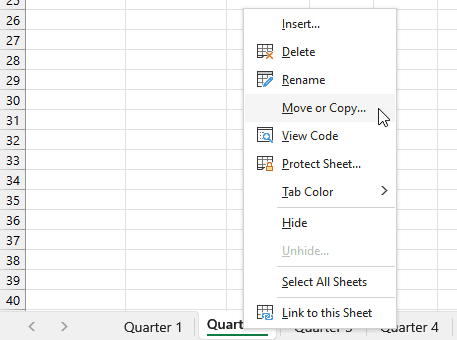
- Go to the first sheet you want to separate. Right-click on the sheet tab at the bottom of the Excel window and select “Move or Copy.”
Note: To select multiple sheets not next to each other, press and hold the “Ctrl” key, and then click on each sheet tab one by one.
If you want to select multiple sheets next to each other, hold down the “Shift” key and click on the sheet tabs in sequence.
- In the “Move or Copy” dialog box, you will see a “To book” dropdown. Select “(new book)” from the list.
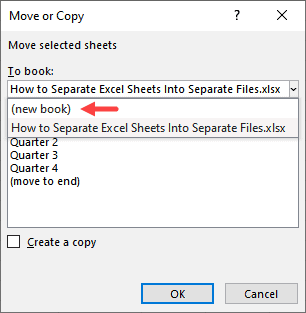
- Leave the “Create a copy” checkbox unchecked to move the sheet instead of copying it.
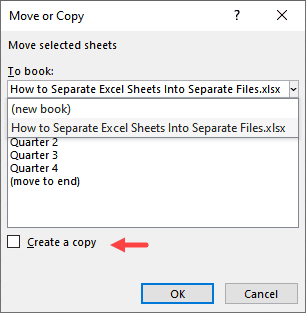
- Click the “OK” button to create a new Excel file with only the selected sheet.
- Save the new file with an appropriate name in the folder you created earlier.
- Repeat steps 2 to 7 for each sheet you want to separate into individual files.
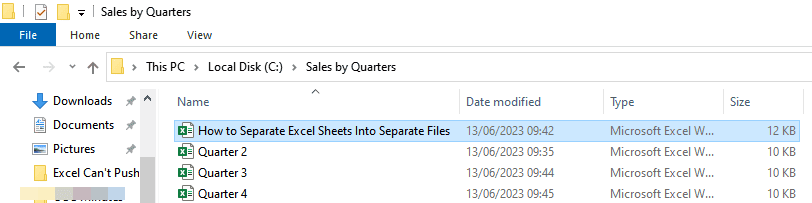
Once you have followed these steps for all the desired sheets, you will have separate Excel files for each sheet in the original file, as shown below:
Note: The current method can be tedious and error-prone if you’re dealing with a workbook with numerous sheets. In such cases, it’s better to use the following alternative technique.
Method 3: Use Excel VBA Code to Separate Excel Sheets into Separate Excel Files
If you have a workbook with numerous sheets, you can utilize Excel VBA code to divide them into separate files.
Let’s assume we have the following workbook with ten worksheets.
We want to create Excel VBA code and apply it to split the worksheets into individual files.
We use the steps below:
- Create a new folder on your computer where you want to save the separated files and save the main workbook into this folder.
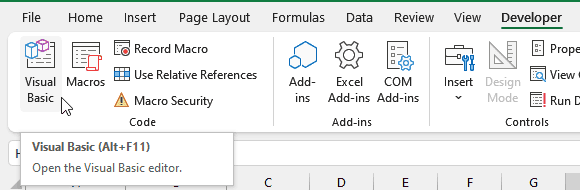
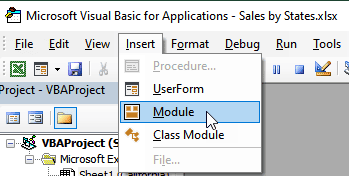
- Open any worksheet in the main workbook and press “Alt + F11” to open the “Visual Basic Editor.” Alternatively, open the “Developer” tab and click the “Visual Basic” button on the “Code” group:
- Open the “Insert” menu and choose the “Module” option.
- Copy and paste the following sub-procedure into the module:
'Code developed by Steve Scott from https://spreadsheetplanet.com Sub SeparateSheets() Dim FilePath As String Dim wsh As Worksheet FilePath = Application.ActiveWorkbook.Path Application.ScreenUpdating = False Application.DisplayAlerts = False For Each wsh In ThisWorkbook.Sheets wsh.Copy Application.ActiveWorkbook.SaveAs Filename:=FilePath & "\" & wsh.Name & ".xlsx" Application.ActiveWorkbook.Close False Next Application.DisplayAlerts = True Application.ScreenUpdating = True End Sub
The code should appear in the module as follows:

- Save the Excel file as an “Excel Macro-Enabled Workbook.”
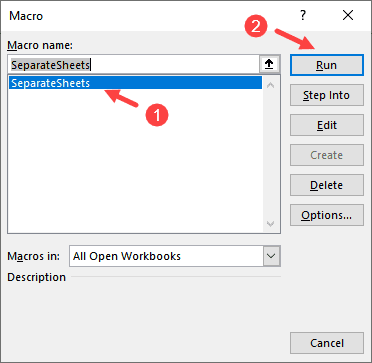
- Press “Alt + F11” to switch to the active worksheet.
- Press “Alt + F8” to open the “Macro” dialog box, select the “SeparateSheets” macro on the “Macro name” list box and click the “Run” button.
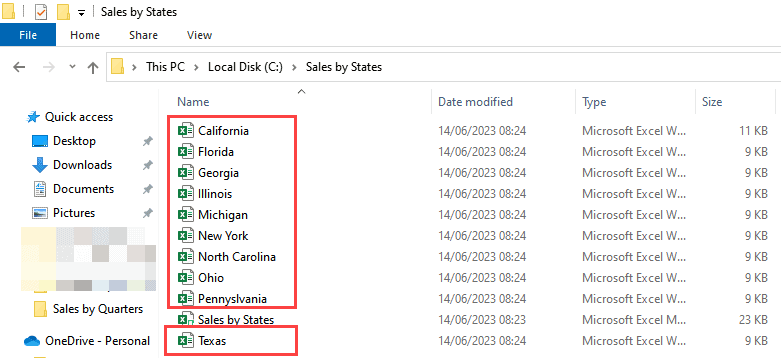
The code runs and divides the worksheets in the main workbook into separate files, as seen in the folder you created in Step 1:
Explanation of the Excel VBA Code
This VBA code separates each worksheet in the current workbook into individual Excel files using the worksheet name as the filename and saving them in the same folder as the original workbook.
Here’s a breakdown of the code:
- The code begins with the declaration of two variables:
- FilePath is a string variable that will store the path of the active workbook.
- wsh is a worksheet variable that the code uses to loop through each worksheet in the workbook.
- FilePath = Application.ActiveWorkbook.Path retrieves the path of the active workbook and assigns it to the `FilePath` variable.
- The lines Application.ScreenUpdating = False and Application.DisplayAlerts = False are used to improve the performance of the code by turning off screen updating and suppressing any alert messages.
- The code then enters a loop with the For Each statement, iterating through each worksheet in the current workbook using the ThisWorkbook.Sheets collection.
- Inside the loop, wsh.Copy creates a copy of the current worksheet.
- Application.ActiveWorkbook.SaveAs saves the copied worksheet as a separate Excel file. The Filename parameter specifies the file path, which combines the original FilePath, the worksheet name (wsh.Name), and the extension “.xlsx.”
- After saving the worksheet as a separate file, Application.ActiveWorkbook.Close False closes the copied workbook without saving any changes.
- The loop continues to the following worksheet until all worksheets are processed.
- Application.DisplayAlerts = True restores the display of alert messages.
- Application.ScreenUpdating = True enables screen updating again.
Method 4: Use Excel VBA Code to Separate Excel Sheets With Names Having Particular Phrases into Separate Excel Files
You may want to separate only those worksheets with names having particular phrases into separate workbooks. You can use Excel VBA code to perform the task.
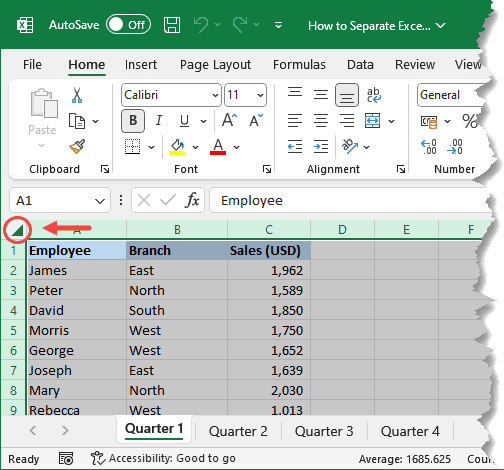
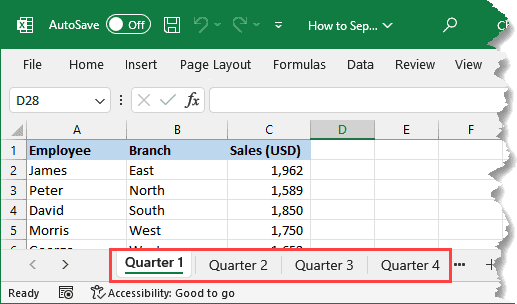
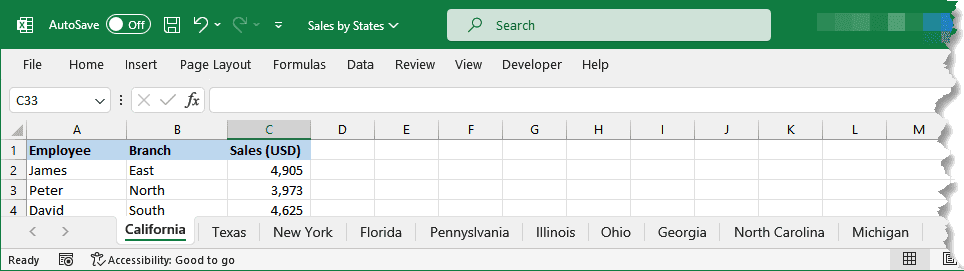
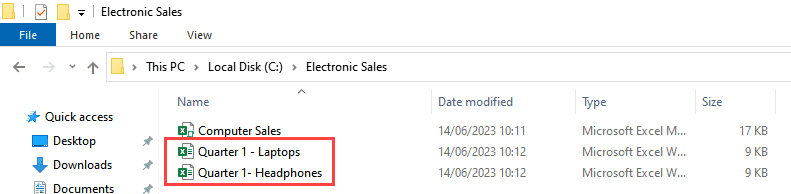
Let’s say you have a workbook that contains sales data for multiple quarters, and each worksheet’s name is labeled with the corresponding quarter number, as depicted below.:

If, for example, you want to separate all the worksheets for “Quarter 1” and save them as individual Excel files, use the steps below:
- Create a new folder on your computer where you want to save the separated files and save the main workbook into this folder.
- Create a new module in “Visual Basic Editor,” as described in Method #3.
- Copy and paste the following code into the module:
'Code developed by Steve Scott from https://spreadsheetplanet.com Sub SeparateSheetWithPhrase() Dim FilePath As String Dim TexttoFind As String Dim wsh As Worksheet TexttoFind = "Quarter 1" FilePath = Application.ActiveWorkbook.Path Application.ScreenUpdating = False Application.DisplayAlerts = False For Each wsh In ThisWorkbook.Sheets If InStr(1, wsh.Name, TexttoFind, vbBinaryCompare) <> 0 Then wsh.Copy Application.ActiveWorkbook.SaveAs Filename:=FilePath & "\" & wsh.Name & ".xlsx" Application.ActiveWorkbook.Close False End If Next Application.DisplayAlerts = True Application.ScreenUpdating = True End Sub
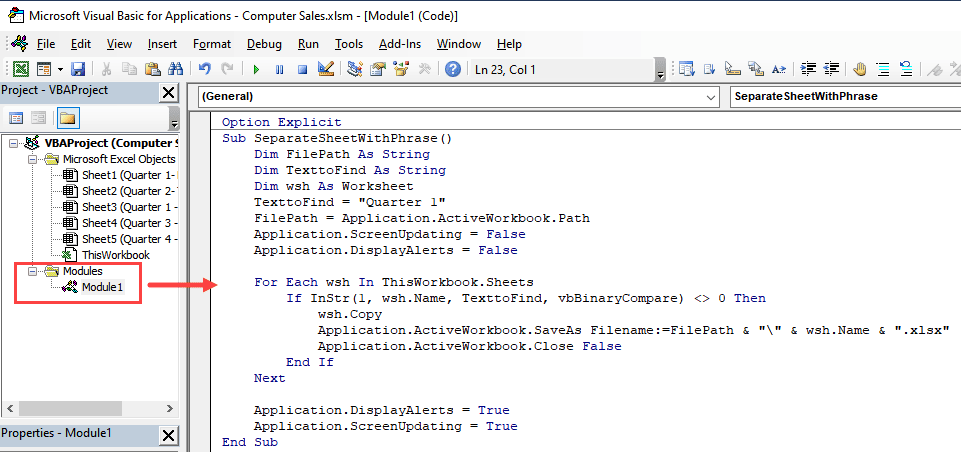
The code should appear in the module as shown below:
- Save the Excel file as an “Excel Macro-Enabled Workbook.”
- Execute the code as explained in Method #3.
The code runs and separates the worksheets that have the phrase “Quarter 1” in their names into individual Excel files, as shown below:
Explanation of the Code
The Excel VBA macro in this method searches for worksheets in the active workbook that contain the phrase “Quarter 1” in their names. For each matching worksheet found, it creates a copy of that worksheet as a separate Excel file, saving it in the same directory as the original workbook.
The breakdown of the code is the same as explained in Method #3, except for the following additions:
- An additional string variable, `TexttoFind,` is defined and stores the phrase to be searched in the worksheet names.
- The “InStr” function searches for the occurrence of the phrase stored in the `TexttoFind` variable within `wsh.Name` (worksheet name). If the phrase is found, “InStr” returns a value greater than 0, and the condition “InStr(1, wsh.Name, TexttoFind, vbBinaryCompare) <> 0” evaluates to “True” and the worksheet is saved as a separate Excel file.
Method 5: Use Excel VBA Code to Separate Excel Sheets into Separate PDF Files
If you need to divide your Excel sheets within a workbook and save them as separate PDF files, you can use Excel VBA code to accomplish the task.
Let’s assume we have the following workbook with ten worksheets.

We can divide the sheets in the workbook into separate PDF files using the following steps:
- Create a new folder on your computer where you want to save the separated PDF files and save the main workbook into this folder.
- Create a new module in “Visual Basic Editor,” as explained in Method #3.
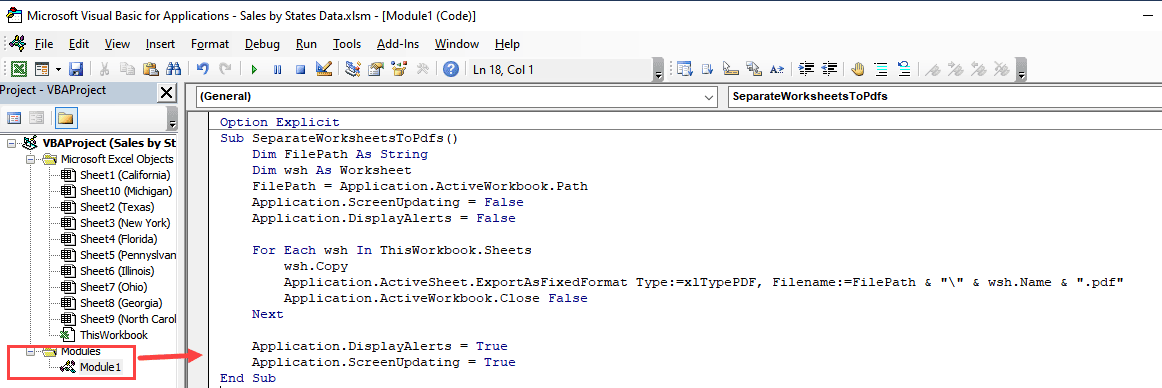
- Copy and paste the following code into the module:
'Code developed by Steve Scott from https://spreadsheetplanet.com Sub SeparateWorksheetsToPdfs() Dim FilePath As String Dim wsh As Worksheet FilePath = Application.ActiveWorkbook.Path Application.ScreenUpdating = False Application.DisplayAlerts = False For Each wsh In ThisWorkbook.Sheets wsh.Copy Application.ActiveSheet.ExportAsFixedFormat Type:=xlTypePDF, Filename:=FilePath & "\" & wsh.Name & ".pdf" Application.ActiveWorkbook.Close False Next Application.DisplayAlerts = True Application.ScreenUpdating = True End Sub
The code should appear in the module as depicted below:
- Save the Excel file as an “Excel Macro-Enabled Workbook.”
- Execute the code as explained in Method #3.
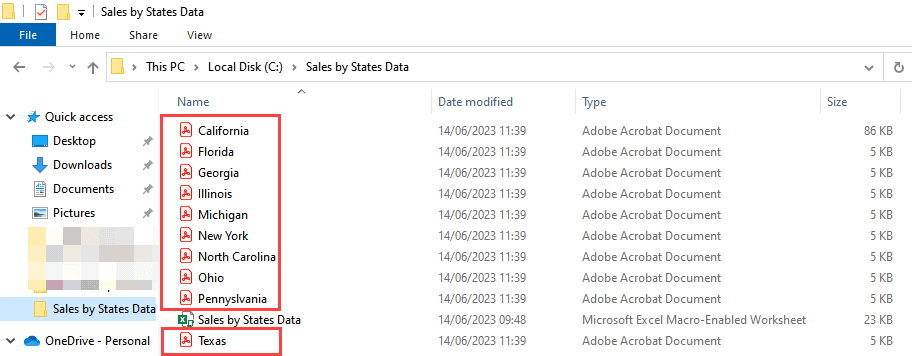
The code runs and separates the worksheets into individual Excel PDF files, as shown below:
Explanation of the Code
The code saves each worksheet in the active workbook as a separate PDF file in the same directory as the workbook itself. It temporarily turns off screen updating and alerts, iterates through each worksheet, creates a copy, exports it as a PDF, and then closes the workbook. Finally, it restores the settings for alerts and screen updating.
The breakdown of the code is as explained in Method #3, except for the following additional statement:
- Application.ActiveSheet.ExportAsFixedFormat Type:=xlTypePDF, Filename:=FilePath & “\” & wsh.Name & “.pdf”: This line exports the active sheet (the copied worksheet) as a PDF file. It uses the “ExportAsFixedFormat” method of the “ActiveSheet” object. The “Type” parameter specifies the export format as PDF, and the “Filename” parameter determines the path and name of the resulting PDF file. Each worksheet is saved as a separate PDF file named after the worksheet.
Some Usecases Where you May Want to Split Excel Tabs into Separate Files
- Data sharing: If you need to share specific data with others, separating sheets into different files allows you to provide only the relevant information, simplifying collaboration and reducing confusion.
- Data security: By creating separate files for sensitive or confidential information, you can control access and restrict sharing to authorized individuals, minimizing the risk of accidental disclosure or unauthorized access to sensitive data.
- File size management: By separating sheets into different files, you can reduce the file size and improve performance, making it easier to work with the data.
This tutorial showed five techniques for separating Excel sheets into separate files. We hope you found the tutorial helpful.
Other Excel articles you may also like:
- Get File Names from a Folder into Excel (Copy Files Names to Excel)
- XLS vs. XLSX Files – What’s the Difference?
- How to Print Multiple Tabs/Sheets in Excel
- CSV vs. XLSX Files
- How to Open DAT Files in Excel?
- How to Open an MPP file in Excel?
- How to Open VCF File in Excel?
- How to Copy Multiple Sheets to a New Workbook in Excel
- VBA to Print Range of Cells to PDF
I am a huge fan of Microsoft Excel and love sharing my knowledge through articles and tutorials. I work as a business analyst and use Microsoft Excel extensively in my daily tasks. My aim is to help you unleash the full potential of Excel and become a data-slaying wizard yourself.
